Step by Step Instructions: How to Paint a Fabric Chair

How to Paint a Fabric Chair
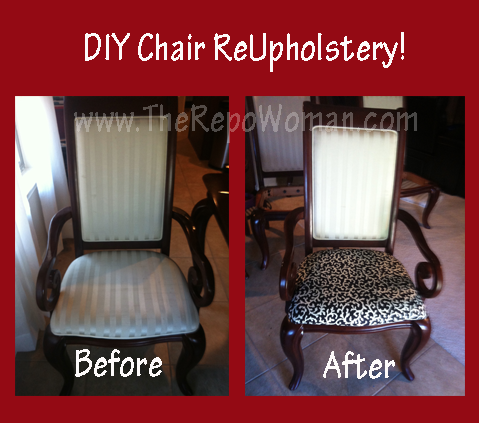
I started a project earlier when I reupholstered my dining room chair seat cushions. I was not happy with the cream colored top part of the chair so I decided to paint it! That’s right! PAINT it! I painted directly on the fabric of the chair! That’s a bit brave on my part because what if it didn’t turn out right… My thoughts were I could easily purchase more fabric and reupholster over it. Have no fear is my motto! I’m not gonna lie though… I was a bit scared! :-O
I started off my testing different painting techniques on a scrap piece of material. I painted directly on the material with a paint brush using Acrylic Paint. Next, I tried painting with a sponge brush. Finally, I tried painting with wet and with watered down paint.
My results from the test: I decided to go with the watered down method. My fabric was not stiff as it was when I painted directly on to dry fabric. The paint left streaks too. The sponge brush also left streaks. When I wet the fabric before I painted on it, it accepted the paint directly into the material. It worked almost like a dye. It absorbed the paint and spread quickly which was perfect because there were no streaks! I’m so glad I tested it!
Instructions on How to Paint a Fabric Chair:
Supplies Needed:
- Acrylic Paint 8 oz (I purchased mine from Hobby Lobby for about $5)
- Paint brush (I suggest a big one and a little one)
- drop cloth (I used an old towel)
- Painters tape
- Styrofoam plate (used for mixing the paint and water)
The hardest part of any paint job is the prep work. Take your time and mask off the edges of the chair so you don’t get paint where you don’t want it.

Next I had to get the cloth part of the chair that I was going to paint wet. I started off using a spray bottle but the bottle was so little that it wasn’t getting it wet enough. I mean wet! I ended up getting a bowl of water and using my paintbrush to paint on the wet water. It worked like a charm! I wonder if I had a bigger spray bottle if that may have worked too. (TIP: Make sure your cloth will accept water to seep into the fabric. If it bubbles up and doesn’t absorb the water then this method will not work for you) After I completely wet the side of the chair I was working on I began to paint it.

I had a special method for this too. I squirted a good amount of paint onto a stryofoam plate and I would dip my paint brush in water and then mix little bits of paint as I began to paint the chair. Having it wet really helped a lot!

After I painted both sides of the chair I immediately put it outside on my patio to allow it to dry.

I live in Texas so it didn’t take long at all to dry. I checked on it after about 2 hours and it was completely dry! At this point you will need to determine if you need another coat of paint or not. If you need another coat of paint, continue painting just as you did above using the wet method.
Voila! My project is complete and it only took me about 2 hours from start to finish to paint these chairs! Nice!
Project costs:
- 1 8oz Acrylic Paint $5.00 (Note: I didn’t even use all of it either)
- Painters Tape $3.50
- Paint Brush (I had one already but I think I spent about $5 on it. It wasn’t the 99¢ ones and I would highly suggest you use a nice brush)
- Spray bottle or bowl of water
- plate
Total Project cost: $8.50 Wow! That’s way cheaper than replacing fabric huh?!!
I love the way my dining room table came out! I’m very glad I did this project!

Enjoy!


This is inspiring me since I’ve had two wingback a I just can’t find the right fabric for. How has it held up and how does it feel to the touch?
It feels like the heavy outdoor fabric. It worked out nicely!